Sunday 8 January 2023

Pattern Making : where to start ? Block or no block?

Pattern Making : where to start?

  •  I start with a block

  • That is the way I have been introduced to PatternMaking from the design school. It is the way we are taught and we don't question it. We even assume that it is the only way to design clothes.
  • Every countries has their own method, own blocks, some call themBlock, some call them slopers.... There are so many methods around are they have their good and bad aspects. Some were very successfull at a time and became out of flavour. I will make diferent post on them as it goes. I have tried many methods and some are better than others.


  • After spending a lot of time on youtube and facebook, I realised that a lot of people make clothes without a block and it seems to be the majority on this planet. They draw garment directly on paper, tracing the lines and curves according to personal measurements. The output is a close fitted dress which fits.
  • I don't know which method is the best: with or without a block. I guess that everybody does as they want and according to what they have learnt , what they want to do


  • Both methods have their pro and cons . Here are my thoughts.
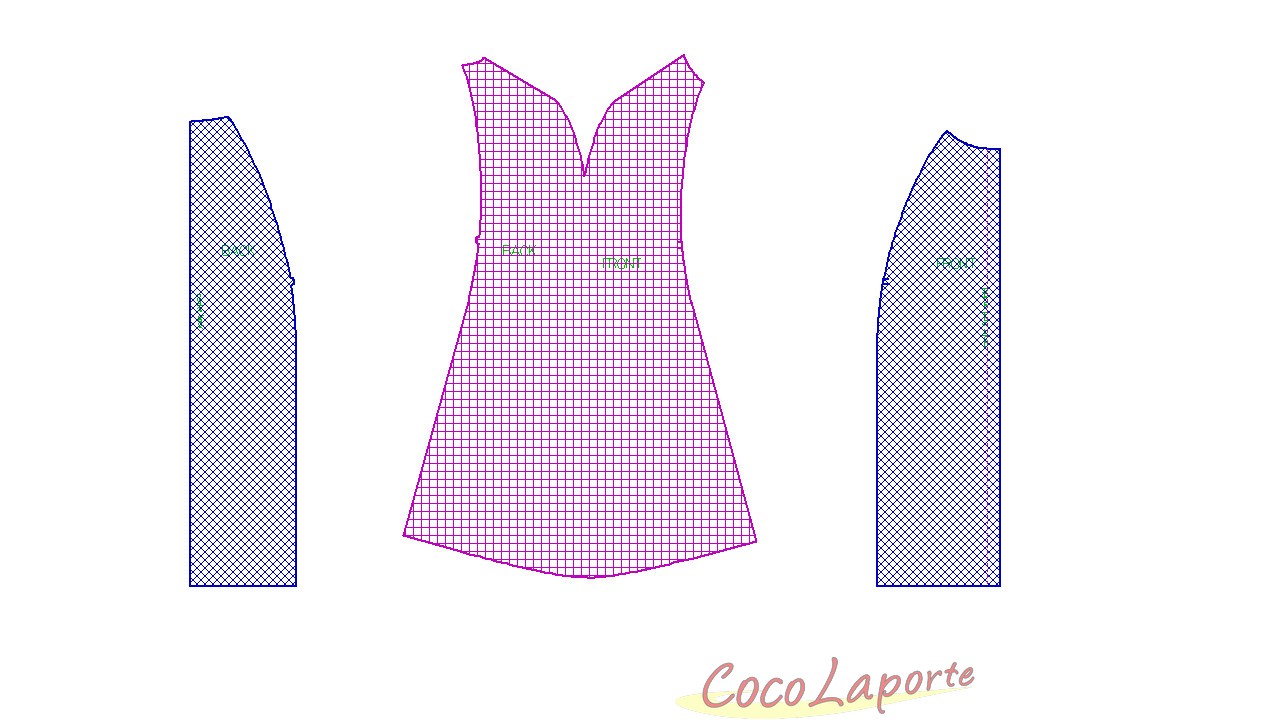

with block

  • save time. By outlining a block, half of the pattern is done already. no need to retrace the lines and measure, all that has been done when drafting the block.
  • can make different kind of garment from the same block. A strapless or a wide coat starts from the same block
  • Knowledge on pattern making technique is necessary like mastering spead and cut techniques.
  • Work with layers on the same drawing is easier.
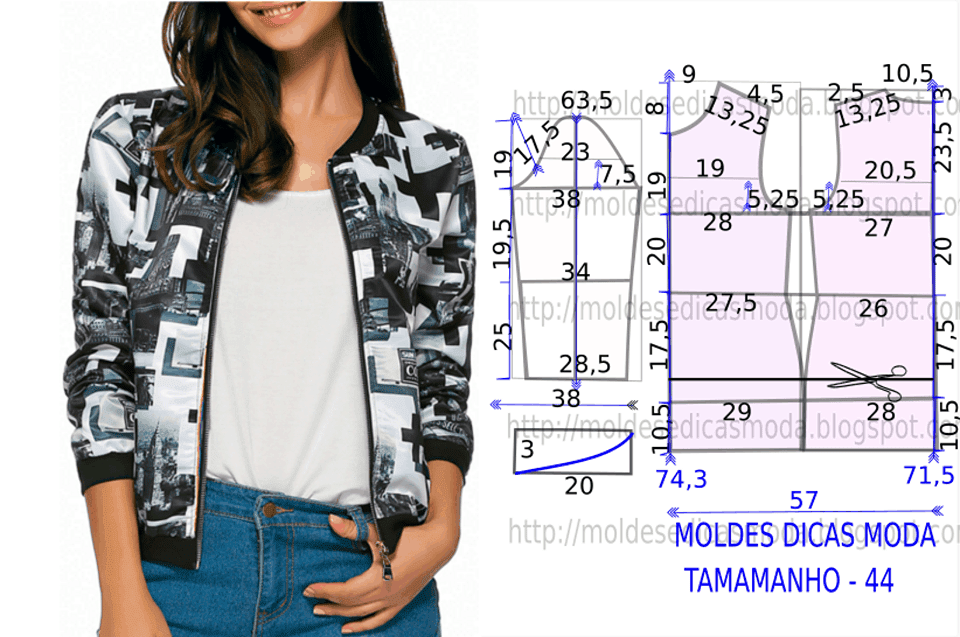
without a block

  • pattern development is harder (cut and spread, pivotting...)
  • good for pattern in one piece.
  • Can be done without technical knowledge in pattern making.
  • more limited: peeple using that technique tend to do the same kind of garment all the time.


This are only thoughts. 
Feel free to tell me what you think and share your experience on which method you use.
In future post, I will be commenting different pattern making methods and their different blocks.
That can help people who browse the internet and only find DIY construction of blocks which don't work.

Stay tuned.


Monday 10 May 2021

How to tile A1 PDF pages into A4 or A3

 My patterns come in A1 or A0 format. I found it easier to prepare, and I can organise layers easily.

When you open the file PDF download of the pattern, you will have a tab on the left called "layer".

Here is the screenshot in Adobe reader and Adobe Acrobate DC

The layer tab is on the left.


See all the sizes. There is a little eye in front of each layer (size) to show or hide.


Here, only size 14 is visible because the other size (layers) are unticked


Choose the size you want to print


That is the print menu


Make sure it is on "actual size"
Then go to poster.

Choose your printer


  • Print all
  • Choose cut marks and overlap for easy assembling
  • Choose portrait and landscape to save paper. 
  • Refer to the window on the right for the tiling ( here 12 pages)
  • Only the layers (sizes) you choose will be printed on A4.
  • You can choose another paper size in the printer property, if your printer print more than A4.


ALL DONE


now you can choose a pattern in my shop HERE


Wednesday 31 March 2021

How to draft the CAPE-RAGLAN


The Cape with a Raglan Cut


 Very, very easy garment to draft. The pattern is done from the basic block so it can be close fitted enough around the shoulder and follow the body shape nicely.


Follow the instruction and the video is at the end of that page for more fluency.


start from the basic dart block


First, dart distribution.


The shoulder dart and the bust dart are pivoted into the armhole for more ease of arm movement. 
There is no sleeve but the extra dart value counts.


Always make sure that the side seams and the shoulder seam dont change length. 


Now , the most important thing : levelling the shoulders


Draw an horizontal line from the lower tip (here the back, it can be the front, depending on your original block)


Lower the tip of the front shoulder so it reaches the horizontal line. The shoulder should have the same length and it can be done by pivotting the segment around the neckline-shoulder point.

Now the shoulders are levelled. It will allow total symetry on the curves drawn from that point down.


Draw the outline of the cape from the shoulder tip.

In our drawing, the cape will be very close fitted. You can draw it further away from the block to make the cape wider.


Mirror that line on the front.

Those curves are equal length because we have levelled the shoulder. It is important as those curves are part of the same seam.


Please, note that, if you have levelled the sides and the shoulder properly, the mirroring of the curve should be easy and be "spot on".


We can leave it here and drafa a simple cape with lateral seams


But we add Raglan cut openings for the arms


Draw the raglan lines.

Draw the front opening overlap line (2 cm away from the center front to position button and buttonhole.


Separate the pieces


Joining the two "sleeve parts".
Make sure than the bottom is the same as the original draft.

The overlap is minimal and at the arm level.

The top of the shoulder turns into a dart.


Round the outlines


And notch properly. The notches mark the end of the seam and the begining of the split to let the arm throught.


and the video :


Thursday 18 March 2021

The Shirt Collar without a stand - How to draft the pattern


How to draw a shirt collar

You can start by drafting a mandarin collar (see previous post there)


The rectangle equal the neckline measurement of the pattern


Raise it of 1/10 the total length.

Note that the raise part (center front side is narrower. The stand is smaller that at center back.


The fall (green line)


Draw the fall. Straight line at the top from center back to center front.
Shape it at center front to look like something you like.
The fall should "cover" the stand, it should be highter.


The stand in blue
The fall in green


Mirror the fall along the straight line.
The collar is taking shape


Modify the center back so it keeps right angles. (red lines)
We can extend down the center back line until a right angle is found. Then curve into the lower line (sewn on the neckline)


In red, we have the new collar outline.

We will have to develop so it sits well.


draw the cutting lines.
3 or 4, at equal distance and close to the shoulder seam : that where the collar turns the most.


Develop the collar.
Pivot at neckline making sure that no value is added there.

3 to 5 mm gap is enought for a small collar


Redraw nice curves and we are done


Watch the video for more details


Friday 12 February 2021

How to draft the pattern of The trumpet skirt 2 : With peplum seam


That skirt is easy to draft. It is a bit more difficult than the previous one HERE


We start the same way as for the other trumpet skirt (see link above).

Skirt block with 2 darts evently distributed.

Lengthen


Join at side seam


Draw a line. It can be horizontal or slanted like on the drawing


Separate


On the bottom part, drawn vertical lines. 5 in my drawing, it could be more. They have to be equal width.


cut on those lines


Spread by pivoting along the top line. That line will curve but will remains the same length.


Redraw the outlines.


Another variante : with a curve instead of a line.


Have a look at the video


Pattern Making : where to start ? Block or no block?

Pattern Making : where to start?  I start with a block That is the way I have been introduced to PatternMaking from the design school. It is...